Put your Nintendo 3DS videos on YouTube
// September 2nd, 2012 // Geeky Stuff
Three weeks ago I became the proud owner of a Nintendo 3DS XL, trading in my DSi XL for it, and I for one am quite impresed with it. There hasn’t been a single day where I haven’t done something on it, like play Super Mario, or take a few 3D photos. Yesterday, I put it through it’s paces and recorded the entire Red Arrows display at the Chatsworth Country Fair in glorious 3D! I wanted to put the videos up on to YouTube but it proved to be difficult. The tutorials I found online took differernt approaches to each other, and not one of them worked that well for me. So… here’s MY guide on how to get your 3DS videos up onto YouTube, so you can share your 3D masterpieces with the rest of the world! You’ll be surprised at how simple the whole process actually is…

Image courtesy of kotaku.com
What you will need:
- PC/Laptop (This tutorial was written for Windows users)
- SD card reader
- Xvid codecs (link)
- StereoMovie Maker (link)
- Freemake Video Converter (link)
The three links above take you to the programs’ respective websites. Go to them, download, and install the software. They’re completely free; they won’t cost you a penny! I’ll wait here until you’ve done it.
Have you done it already? Great, let’s get cracking!!
Step 1: Get your video off your 3DS and onto your computer.
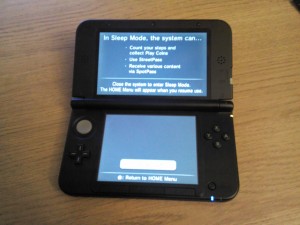
Every Nintendo 3DS comes with an SD card on which to store photos, videos, games and save game data on, as well as other things. Every video you record should be on your SD card. Completely power down your 3DS by pressing and holding the power button down until you see a “Power Off” button on the touchscreen. Tap “Power Off” to completely shut off the 3DS. For those wondering why you need to do this: it’s to ensure that nothing is using your SD card before you remove it. Not taking this step could damage the data on your SD card.
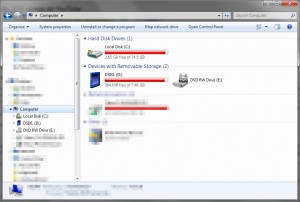
Remove the SD card and insert it into the SD card reader, which in turn should be connected to your computer. The card should then appear as a new drive under “My Computer”.
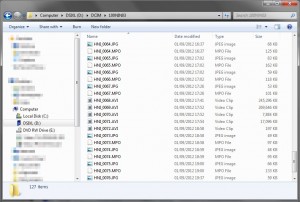
Explore the new drive (aka SD card) and open the DCIM folder. This is where all your photos and videos are stored. Explore the different sub-folders under the DCIM folder until you find your 3D video.
HINT: 3D videos will have filenames such as “HNI_XXXX.AVI”, where XXXX is a series of numbers.
If you’re not sure which video is the one you want, you can happily open them on the computer with your default video player by double-clicking the video file. Most likely, your video will play back in 2D. Don’t worry if this is the case for you. The video file contains both video streams (one stream for each outward-facing camera on your 3DS, each representing a different eye). If your video player is playing in 2D, it’ll simply be playing back just one of these streams, but rest assured both streams are there.
Once you’ve found your video, copy it to your computer. You can copy it anywhere but, for the sake of this tutorial, we’ll place it in a newly created folder on our desktop called “3DS Videos”.
Step two: Change the video into side-by-side format.
What do I mean by “side-by-side” format? At the moment, your video file contains TWO separate video streams: one from the left camera, and one from the right. Think of it as two seperate video files stored neatly and cleverly into one file. Nintendo have most likely done it this way in order to make things simple for everyone, but sadly it causes a problem when we want to put our videos on YouTube, since YouTube doesn’t support this type of file. If you were to upload your video straight to YouTube, it’ll be in 2D as it will only detect one of the two video streams in the file. Hopefully in time, YouTube will support these files but for now we have to convert them into a “side-by-side” format. This means taking both our video streams (remember: one for the left eye, and one for the right) and putting them together into ONE video stream that shows us both videos next to each other, side-by-side. To do this, we will use StereoMovie Maker (link above).
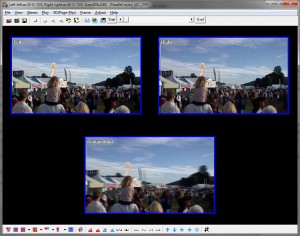
Open StereoMovie Maker and go to File -> Open Stereo Movie. Open your video files from the “3DS Videos” folder (or wherever you’ve saved it). You should see a screen like this:
Notice you can see both streams of your video now, plus a 3rd one showing an overlay of the two. However, the overlay won’t look quite right at the moment. Press Alt+K to align them up automatically. If you want to play around with the depth a bit more, you can simply press K to bring up a huge dialog box with a number of different options. For the purpose of this tutorial, we’re doing it the quick way!
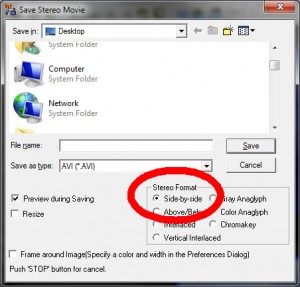
Now let’s save our file. Go to File -> Save Stereo Movie. Give your new video a name and make sure “Side-by-side” is selected in the “Stereo Format” box. Hit Save and you’ll be shown another dialog box. This is where our Xvid codecs come in! From the dropdown list, choose “Xvid MPEG-4 Codec” and then click the “Configure” button. On another dialog box you should see a slider near the middle. This slider controls how much quality is maintained when the video is saved. The higher the quality, the bigger the file; the lower the quality, the smaller the file. However, we don’t want to skimp on quality, so slide it all the way to the left. Click “OK”, and then “OK” again on the previous dialog box, and your video will start saving. The resulting file will be much bigger than the original, so don’t worry if it starts looking excessively large (Like over 100Mb or even more! A 10 minute video can be upwards of 300Mb). Once the file is saved, you should have another video showing BOTH streams together, side-by-side. You might think “Great! Let’s get this uploaded to YouTube!!”. We don’t do this just yet…
Step three: Re-encode the video to be more suited for YouTube
We need to re-encode the video before we upload it to YouTube. There are many reasons for this:
- Firstly, the file will be very large, so uploading it will take a great deal of time! Regardless of your broadband speed, UPLOAD speed is often much less than download speed. You’ll be sat there waiting forever!! Re-encoding your video will make it much smaller, and therefore will be a damn sight quicker to upload.
- Uploading an extremely large file will eat away at a huge chunk, if not all, of your broadband allowance. Most ISP’s specify a usage allowance per month. It differs between ISPs and the type of package you have but, if say you have a 1Gb/month allowance and your resulting file is 500Mb, then by uploading it you’ll have wiped away half a month’s usage allowance. Worse yet, if uploading the file pushes you over your usage allowance, you may be charged extra by your ISP or even have your service cut off altogether! Re-encoding your video will cut down the size of the video by an awful lot, so you needn’t worry so much about going over your allowance.
- The video we have at the moment won’t look quite right even if you uploaded it now. At the moment, the video is the same height as it was when you recorded it, but it’ll be twice the width. This is because we’ve taken our two video streams and set them side-by-side into one really wide stream. Uploading the video now will result in absolutely huge black borders on the top and bottom of the video when being viewed on YouTube. It will also cause the video to appear horizontally stretched when viewed online. Re-encoding allows us to deal with these issues before uploading, by “squishing” the dimensions of the video into a more acceptable size.
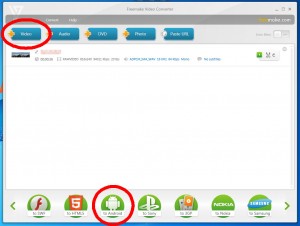
To re-encode your video, open up Freemake Video Converter (link above), hit the “+ Video” button and open up your new (very large) video file.
We’re now going to re-encode our video into a format known as MP4, a common video format used by computers and mobile devices. To do this, click the “to Android” button at the bottom of the window. Don’t worry that we haven’t hit the “to YouTube” button. Doing that will make us upload the video to YouTube right away. That’s not what we want.
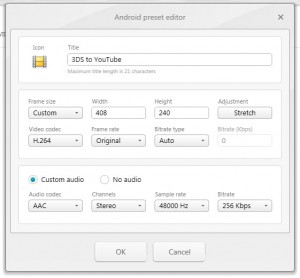
On the new dialog box that’s appeared, click the green “+” (plus) button to create a new preset. We’re doing this so that, if you need to repeat this process again for future 3DS videos, you can simply reuse this preset without having to reconfigure Freemake Video Converter each time. Set up all the options as shown below (don’t worry about the icon. You can set that to whatever you want, or just leave it as it is):
Title: 3DS to YouTube
Frame size: Custom
Width: 408
Height: 240
Adjustment: Stretch
Video codec: H.264
Frame rate: Original
Bitrate type: Auto
Audio: Custom Audio
Audio codec: AAC
Channels: Stereo
Sample rate: 48,000 Hz
Bitrate: 256 Kbps
Hit OK and then click “Convert”. The conversion shouldn’t take very long at all, and soon enough you’ll have another new video file under “My Videos” with the same name as the file you made in the previous step (except with a .mp4 extension instead of .avi). THIS is the file we’re going to upload to YouTube, but we’re not done yet with our tutorial.
Step four: Uploading to YouTube
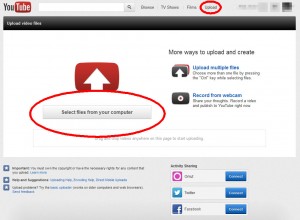
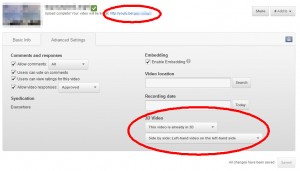
Log on to YouTube using your favourite web browser and click the “upload” link at the top of the page. Click the big “Select files from your computer” button and find your new video under “My Videos” on your computer. Select it, click “Open”, and your file should start uploading. Feel free to change any of the basic info for the video while it’s uploading, but there’s one setting you need to set in order for your video to show on YouTube in glorious 3D.
Click the “Advanced Settings” tab and, in the bottom-right corner of the box you’ll see an option for “3D Video”. The drop-down below this should currently say “No preference”. Change this to “This video is already in 3D”. Another drop-down box should appear giving you different 3D options. Ensure that it’s set to “Side by side: left-hand video on the left-hand side”, and then hit “Save changes”.
Once your video has finished uploading and processing, you’re good to go!! Follow the blue link near your new video’s thumbnail to see your video in the various forms of 3D YouTube has to offer.
Thanks for reading!! Please feel free to leave comments on how this can be improved and, if you’ve been successful in uploading your 3DS videos to YouTube, why not leave a comment with a link to your new video for all to see?

 Andy Irvine is a web developer residing in the heart of High Peak, Derbyshire. He has over a decade of experience with various web technologies, specialising in OOPHP5, HTML5 and CSS3. He has created dozens of websites, and has worked with many Content Management Systems. In his spare time, he researches web technologies but he also enjoys playing guitar, photography, and cooking.
how do you get your videos onto your sd card? mine are saved onto my game card.
Hi scoreman56,
Open your Nintendo 3DS Camera application and tap the ‘Settings’ button in the bottom-right corner of the touchscreen. The first option on the screen indicates where your photos and videos are saved: System or SD Card. Tap it and select ‘SD Card’ before hitting ‘Confirm’. Now, all your subsequent photos and videos will be saved to your SD Card.
If you have photos and videos saved in System storage that you want to move to the SD Card, tap the ‘Data Management’ button while in ‘Settings’ and then tap the ‘System to SD Card’ button at the top of the touchsceen. This will copy all the system photos/videos to your SD Card.
Hope this helps 🙂